
Wednesday, October 27, 2010
Surgery Tomorrow.. No New Cards For A Few Days...
Hi everyone! I have been busy tying things up before my surgery tomorrow. Sorry that I have not added any new cards today. There will probably not be any new ones tomorrow either. I just wanted to let everyone know that I am not slacking just busy. I appreciate all your kind comments and love all of your visits to my blog. Please keep coming back and please follow me if you have not done so already. I want you to be a part of my contests and giveaways but need to be a follower to do so. Contests and giveaways are coming soon. I will post something tomorrow if I can letting you all know how I am doing. Talk to you soon! ~Terri

Tuesday, October 26, 2010
Happy Birthday Card

This is what you need to make it:
Stretch Your Imagination Cartridge
Patterned Paper
Striped Glittered Paper
White Cardstock
Blue Grosgrain Ribbon
Happy Birthday Stamp
Pop Dots
Adhesive
Your finished card size will be 4 1/4" x 5 1/2" in white cardstock
The Patterned Paper Mat size is 4" x 5 1/4"
The Striped Paper Mat size is 1 1/2" x 5 1/4"
The Birthday Present is on page 59 in your handbook
Cut out at size 2 3/4" in <Prsnt> in the Blue Cardstock
Then cut out the same present in the Shadow Feature in White
Using the Layers Feature cut out the Bow in the Striped Paper
I embossed the present using the Cuttlebug and the Happy Birthday Embossing Folder.
That's it.. so simple, so easy! Leave me a comment where I can see your finished card. Thanks for looking! Terri
Monday, October 25, 2010
Happy Halloween Card

This is a Halloween Card that I just made.. simple yet grown up.
No Cricut needed..
This is what you need to make it:
Orange Cardstock
Off White Cardstock
Ravenhead Manor Recollections ~
Off White & Orange Striped Cardstock
DCWV Black & Off White Polka Dotted Paper
Martha Stewart Spider Web Punch
Black Ribbon
Happy Halloween Stamp
The Measurements:
Your finished card size will be..4 1/4" x 5 1/4"
(not sure why I did not make it the standard 4 1/4" x 5 1/2")
The Orange Striped Mat size is 1 1/2" x 5"
Black Polka Dotted Mat size is 2 1/2" x 5"
The Off White Spider Web Mat size is 1 1/4" x 5 1/4"
Add Black Ribbon
I Stamped Happy Halloween and cut the mat to fit
That's it. Very simple. Have fun and as always I would love to
see your finished project. If you have not already subscribed to follow me please do, I would love to have you.
Happy Birthday Girly Card

To make this card this is what you need:
A Child's Year Cartridge (page 73)
Black Cardstock
Blue Cardstock
White Cardstock
Light Brown Cardstock
Happy Birthday Ribbon from Martha Stewart
Happy Birthday Stamp
Blue Gem for the dress
Martha Stewart Punch, Not sure of the name, sorry!
Pop Dots
Adhesive
How to make:
Your finished card size will be 4 1/4" x 5 1/2"
The Light Blue Mat size is 4" x 5 1/4"
The Patterned Paper Mat size is 3 3/4" x 5"
The Light Blue Mat size on the bottom is 1 1/2" x 3 3/4"
The Loop Punch Paper size is 1 1/4" x 3 3/4"
The Happy Birthday Stamp Mat is cut to fit.
It's approx. 1 1/2" x 1 1/4"
I cut out the doll in the dress at size 3 3/4" in the Blue Cardstock
Then I cut out the doll again using the Shadow Feature in 3 3/4" in White Cardstock.
Use the Light Brown Cardstock and adhere it to the back of the Blue dress where the bows are punched out by the cricut.
See picture.
Use Pop Dots for the Doll in the Dress
Add Happy Birthday Ribbon and Blue Gem for the Dress
So that's the card for this morning. I am working on another card so hopefully it will get posted sometime today or tonight. Thanks for looking and if you are not a follower already please sign up.
Talk to you soon~ Terri
Thank You All!!!
I wanted to thank all of you new followers for joining my blog! It really means alot to me. We are going to have alot of fun here. Lots of giveaways, lots of contests and lots of fun! If there is anything that you want me to put on here just let me know and I will do my very best to get that for you. I started working on a new card late last night. I did not get to finish it because I was gone all day with my 2 kids as they had a film project that they were involved in (thank's again Amy & Eric). I started it as soon as I got home which was around 10:30 pm or so. We were all dead tired so I did not get to finish it. Some time today I will finish it and post it with the directions on how to make it. Thank's again for being a new Terri Tv follower. I want this blog to be a place that you can come to for inspiration, ideas and just plain fun. Talk to you soon. Terri
Sunday, October 24, 2010
Halloween Treat Bags.. CUTE!!!

Today has been very busy for me. I wanted to make a few cards but did not get a chance to. I was out getting my 11 year old son Casey's halloween costume. Anyhow, I was thinking about what type of treat bags I was going to make for Casey and my 9 year old daughter Hallie's school class. Every holiday I always make treat bags but wanted something a little different and cuter.
I came up with this. I used Martha Stewarts Drippy Goo punch for the edge of this tag that says Happy Halloween.
I thought they turned out really cute. Now I only have to make 60 more..lol. I hope this gave you some idea on how you want to make your child's treat bags. Maybe you don't have kids and you just want to make goodie bags to pass out on halloween. This would be adorable. Oh, the little clear bags I got at Walmart. They were so cheap, only $2.00 for 100 of them..I think it is 100. Anyhow, they are super cheap but there is so much you can do with them. I would LOVE to see your finished treat bags. Leave me a comment and tell me where I can go to see them and I will leave you a comment back.
Thank you for looking and come back soon.
Saturday, October 23, 2010
Boy Did I Hit The Jackpot Today... WOW!!!
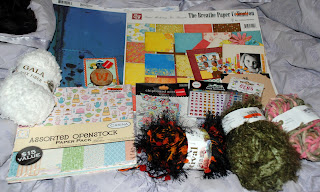
Today I was out and about and I decided to stop at Big Lots. I have not been there in years. So I go in and first stop at the halloween candy, which I needed. So I got alot of candy, little toys for all the trick or treaters. Then I went to the scrapbook isle and man..there were soooooo many great deals. I am talking Martha Stewart ribbon for $1.00..most of them were only $.50 so I got them ALL. I spent $30.00 on scrapbooking/card supplies and I got about 38 rolls of ribbon. Not all of them are Martha Stewart, just a few of them are. But still.. what a great deal. Then I looked at the paper and cardstock. They were so cheap and I plan on going back again soon. Here is 2 pictures of my loot. Oh, and I got 4 fiber yarn rolls for $1.00 each. What a crazy deal. I would run, run and run to your local Big Lots to see what they have. I even got some alphabet stamps, a glitter patterned paper stack, 12 x 12 paper stack and another 12 x 12 blue paper stack, some embellishments and more. Anyhow, just wanted to share. Thanks for looking! Come back soon. I add something each and every day.


Thursday, October 21, 2010
Lady Bug Lady Bug Card

Here is a little Lady Bug Lady Bug card that I just made using the
Nursery Rhymes cartridge.
If you want to make this card this is what you need:
Your finished card size will be 4 1/4" x 5 1/2"
***(Tip: If you take an 8 1/2" x 11" piece of cardstock and cut down the middle you will have enough for 2 cards. Another tip, I always score my papers before I cut and that way I know for certain that it is perfectly straight)***
Nursery Rhymes Cartridge
Red Cardstock
Black Cardstock
Polka Dotted Paper (this is DCWV La Creme Pack)
Ribbon, this Lady Bug ribbon I have had in my stash forever.. I am sorry that I cannot tell you where to buy it.
Adhesive
Zots
How to make:
Cut out your little Lady Bug Fairy's at 2 1/2"
Cut out the Lady Bug Fairy's in the
Base Shadow Blackout Feature at 2 1/2"
Base Shadow Blackout Feature at 2 1/2"
Cut out the "Lady Bug Lady Bug" Phrase using the
Phrase Feature at 1 1/2"
Phrase Feature at 1 1/2"
Then cut out the same phrase in the
Phrase Shadow Blackout feature at 1 1/2"
Phrase Shadow Blackout feature at 1 1/2"
Adhere the ribbon, tie a bow and use Zots to adhere it to the card. I always use a couple to make sure it will stay put.
I hope you enjoy this card and I add new cards almost every day. Please click "Follow Me" and come back often. I will be having great giveaway's, contests and other fun stuff. You will miss out if you do not follow me and I don't want that!
Thank you for coming by my blog.
Have a great day!
Upcoming Contest & Giveaways....
I am going to be doing some contests and giveaways..but I first need more followers!
If you like contests and giveaways then click "Follow Me" and check back very soon for
many many opportunities to win some amazing prizes.
6 Little Pumpkins

This card is a different take on pumpkins. I love cutsie cards but I also love grown up cards like this.
Here is what you need to make this card:
I used the Die Cuts With A View La Creme Stack Pack
Die Cuts With A View Latte Stack Pack
The Paper Dolls For Everyday Cartridge
The Pumpkins were cut out at 3 1/4" each
I used some Green Ribbon that I had in my stash
Your Finished Card Size will be 4 1/4" x 5 1/2"
Your Green Mat Size is 4" x 5 1/4"
I would love to see your finished project..leave me a comment and tell me where I can see your little pumpkin card! Thanks for looking! Terri
Over The Moon Witch Halloween Card

Here is a cute halloween card that I just made this morning.
Here is how to make it..
Materials used:
A Child's Year Cricut Cartridge
Nursery Rhymes Cricut Cartridge
Purple Patterned Cardstock
Purple Cardstock
Black Carstock
Yellow Cardstock
Chalks
Black Ribbon
Happy Halloween Stamp
Pop Dots
Adhesive
Your finished card size will be 4 1/4" x 5 1/2"
Purple patterned mat size 4" x 5"
Purple Cardstock size 2" x 4"
Witch cut out size is 3.82" using my Gypsy
Moon cut out size using my Gypsy is 5.71"
The moon that I used came from the Nursery Rhymes cartridge and the true image is of the
Cow jumping over the moon...
I took my Gypsy and made it where the extra stars did not cut out and then
I cut the cow off of the moon because I did not need that part. I chalked the edges of the moon with black chalk and a gray shimmery from Pebbles
If you have any questions please let me know and I will do my best to help answer them for you.
Thanks for looking! Please leave me comments, I love them!
Wednesday, October 20, 2010
Grown Up Classy Pumpkin Card
.jpg)
I wanted to make a grown up classy pumpkin for the holidays and so I looked through my
Mini Monsters Cartridge and found this adorable pumpkin. So here is the Pumpkin Card that I just made.. yes, it is 1:35 am and I am still up making cards.. :o)
This is what you need to make this beautiful pumpkin card.
I love it because it is different from a normal looking orange pumpkin...the paper is just beautiful.
It is flocked and is very heavy duty. I had to put my blade depth at 6, pressure at max and I still
had a time getting it off the mat.
Materials Needed:
Mini Monsters Cricut Cartridge
Die Cuts With A View La Creme Stack Pack
Die Cuts With A View Latte Cardstock Pack in Green
(it looks like wood)
(it looks like wood)
Cuttlebug & Embossing Folder
(I am sorry, I do not know the name of the folder that I used)
(I am sorry, I do not know the name of the folder that I used)
Adhesive
How to make:
This finished card will cut out at 7" on your cricut
The pumpkin is on page 60 in the Mini Monsters Handbook
Cut out the Pumpkin in the Card Feature in Black Cardstock from DCWV
Cut out the front part of the card using Layer 1 and using DCWV Patterned Cardstock
Cut out the Stem and Leaf using the Layer 1 feature and hit Shift
Run the Stem & Leaf through the Cuttlebug
That's it for this card, it is so simple..just adhere it all together and you are done!
Tuesday, October 19, 2010
Life Is Tweet Card

This is a little card that I just got done making. It turned out so cute. Here is what you need to make it.
Straight From The Nest Cricut Cartridge
Polka Dot Cardstock from Premium Stacks Latte Stack Textured Cardstock
Dark Purple Cardstock from Premium Stacks Latte Stack Textured Cardstock
Green Cardstock
Off White Cardstock
Black Cardstock
Brown Cardstock
Pebbles Chalk in Earth Tones
Adhesive
Pop Dots
Your finished card size will be 4 1/4" x 5 1/2" in black cardstock
The Bird is on page 28 in the manual
I cut out the Bird at size 2 1/2"
The "Life is Tweet" is cut out at 1 1/2" in the Off White
Hit the Phrase Shadow button and cut the phrase out
again in Green Cardstock
The first bird cut is <Bird1-s> which you have to hit shift
Then I cut out the Wing at 2 1/2" and chalked the edges
Then I cut out the Bird using the Layer/Shadow feature
in a Brown Cardstock
The Cardstock is measured at 2" x 5 1/4" for both the
polka dot and purple
(I cut them both that size and took the ribbon to hide the seams)
Take your Grosgrain Ribbon in a Country Green and hide
the seams of the cardstock
Use your pop dots to adhere the bird on your card after
placing the ribbon
Then glue your phrases together and adhere them to the card
Chalk all the edges of your bird, wing, beak and bird
legs for dimension
Viola, that's it! It was a simple yet cute and fun card to make.
Please feel free to leave me a comment to let me know what you think about this card. I would love to see your finished project as well. Thanks for looking.
Terri's Favorite Tool For The Week...

Is the Pink Cuttlebug Embossing Machine.
I bought mine at hsn.com. This Cuttlebug is a bundle that comes with these embossing folders..
- Dark pink Butterfly Cuttlebug machine
- Swiss Dots A2 embossing folder
- D'vine Swirl A2 embossing folder
- Spots and Dots A2 embossing folder
- Snowflakes A2 embossing folder
- Happy Birthday A2 embossing folder
- Victoria A2 embossing folder
- Birds and Swirls A2 embossing folder
- Lace Tree A2 embossing folder
- Stylized Flowers A2 embossing folder
- Frills border set (5 pieces)
- Just My Type border set (5 pieces)
- With Love border set (5 pieces)
- Spacer block
- 2 cutting pads
- Handle
- Hex key, screw and plastic cap
- User manual
Slideshow At Photobucket
I am having trouble putting a slideshow on my blog so for now here is a link to the slideshow. Thanks for stopping by. Please leave me a comment and let me know what you think.
http://s1034.photobucket.com/albums/a428/TerriTv/
http://s1034.photobucket.com/albums/a428/TerriTv/
Gypsy 6 Free Cartridges Just By Registering...
FREE CARTRIDGES INCLUDE:
~ Smiley Cards (new and exclusive to this promotion) ~ Tags, Bags, Boxes & More (not available in retail) ~ Christmas (not available in retail) ~ Blackletter (not available in retail) ~ Printing Press (not available in retail) ~ Indie Art (not available in retail)
All current Gypsy owners are INCLUDED!! Simply register your Gypsy by October 31, 2010 and get access to all downloads. Register at www.cricut.com/gypsy.
Downloads will be available through a special update to your Gypsy starting November 1st!!
New Gypsy cartridge downloads are easy! Just connect your Gypsy to your computer and you'll automatically be prompted how to start. In just a few steps, you'll be able to download all six cartridges containing thousands of images! And with the Gypsy, you'll have all the cartridge artwork and keypad overlays on your Gypsy screen, so there's no actual cartridge, handbook or packaging.
You only have a few weeks. Don't miss out!
Monday, October 18, 2010
Cricut Cartridges..My Complete List

Below is a list of all the Cricut cartridges that I currently own...
New cartridges are being added all the time.
As you all know craft supplies can be quite expensive especially these cartridges
so finding amazing deals is how I save money. I NEVER spend more then $15.00 on a Cricut cartridge, even if it is a brand new release or even a retired cartridge. There is one place that is my go to place when purchasing cartridges and if you are interested in learning how I save so much money leave me a comment and I will reveal my secret shopping spot. Well it's not a secret per se' but you know what I mean! <wink> Honestly I cannot tell you how many times I have bought a brand new cartridge and literally spent less then $5.00 and every single one was brand spanking new still in the clam shell. Sounds impossible doesn't it? Well I am here to tell you that it is not impossible. Not at all!
Ok so here is my current list of the cartridges that I own...
**list updated on 12-20-16**
9 Months
50 States
A Child's Year
A Frightful Affair
All Mixed Up
All Occasion Boxed Cards
All Sports
All Wrapped Up - Cricut Imagine
Alphalicious
An Ocean Of Words-Word Builders 3
Ancestry - Cricut Imagine
Ancestry - Cricut Imagine
Animal Kingdom
Anna's Lace Cards and Embellishments
Anna's Ribbons and Bows - Anna Griffin
April Showers Seasonal
Art Deco
Audrey Pattern - Cricut ImagineB Is For Boy
Baby Boutique - Cricut Imagine
Baby Steps
Basketball
Basketball
Batman-DC Comics
Best Friends - Cricut Imagine
Birthday Cake Art - Martha Stewart
Best Friends - Cricut Imagine
Better Together - Cricut Imagine
Billionaire
Birthday BashBirthday Cake Art - Martha Stewart
Birthday Cakes - Martha Stewart
Bits and Pieces
Blackletter
Blast Off - Cricut Imagine
Blossom - Cricut Imagine
Blast Off - Cricut Imagine
Blossom - Cricut Imagine
Botanicals - Cricut Lite
Boys will be Boys
Boys will be Boys
Bridal Shower
Brooklyn Iron-on
Bubblegum Stripes - Cricut Imagine
Buccaneer - Cricut Imagine
Buccaneer - Cricut Imagine
Cake Basics
Calligraphy Collection
Camp Out
Camping Critters
Cars - Disney
Car Decals
Celebrate With Flourish
Cars - Disney
Car Decals
Celebrate With Flourish
Celebrations
Chic & Scary
Christmas
Christmas Noel
Christmas Village
Cindy Loo
Christmas Village
Cindy Loo
Create a Critter
Create a Critter 2
Create A Friend
Creative Holiday Cards
Cricut Office Help
Country Life
Cuttin' Up
Damask Decor
Days & Dates
Designer's Calendar
Destinations
Dino Play
Disney Classics - Disney
DonJuan
Doodlecharms
Doodletype
Dr. Checkup
Dreams Come True - Disney Princess
Edge to Edge
Elegant Cakes - Martha Stewart
Elegant Embellishments - Anna Griffin
Elise - Cricut Imagine
Elmo & Friends Holiday
Elmo's Party - Sesame Street
Enjoy the Seasons
Everyday Paper Dolls
Everyday Pop-Up Cards
Everyday Pop-Up Cards
Fabulous Finds
Fancy Frames
Floral Embellished
Floral Emporium - Cricut Imagine
Floral Emporium - Cricut Imagine
Flower Shoppe
Fontopia
Forever Young
Formal Occasion
Four Legged Friends
Frame of Mind
French Manor
Freshly Picked
From My Kitchen
Frozen - Disney
Garden Soup
Giant Flower Project Cartridge
Gingerbread
Girl's Makeup Party
Gingerbread
Girl's Makeup Party
Give a Hoot
Go Canada
Going Places
Graphically Speaking
Groovy Times
Groovy Times
Gypsy Font
Gypsy Wanderings
H2O
Hannah Montana - Disney
Happily Ever After - Disney Princesses
Happy Hauntings
Heirloom - Cricut Imagine
Happy Hauntings
Heirloom - Cricut Imagine
Hello Kitty Font - Sanrio
Heritage
Hey Diddle Diddle - Cricut Imagine
Hey Diddle Diddle - Cricut Imagine
Holiday Cakes - Martha Stewart
Holiday Snowflakes
Holidays Through the Year Iron-on
Home Accents
Home for the Holidays - Fall & Winter
Home Organization
Hopscotch - Cricut ImagineImagine More Art - Cricut Imagine
Imagine More Cards -Cricut Imagine
Independence Day
Indie Art
Industrial Glow - Cricut Imagine
Inspired Heart - Cricut Lite
Industrial Glow - Cricut Imagine
Inspired Heart - Cricut Lite
Jasmine
Joys of the Season
JT - Cricut Imagine
JT - Cricut Imagine
“Just Because” Cards
Kate’s Abc’s
Kate's Kitchen - Cricut Imagine
Kate's Kitchen - Cricut Imagine
Lacy Labels - Cricut Lite
Learning Curve
Life's a Party - 3 Birds
Live Simply
Life's a Party - 3 Birds
Live Simply
Locker Talk
Lori's Garden - Cricut Imagine
Love Struck 2010
Lori's Garden - Cricut Imagine
Love Struck 2010
Lovely Floral
Makin' The Grade
Mickey Font - Disney
Mickey and Friends - Disney
Mini Monograms
Mini Monsters
Monster Bash
Mr. Frosty - Cricut Imagine
Mr. Frosty - Cricut Imagine
My Community
My Quiet Book
My World
Mystical Garden - Cricut Imagine
Nate's ABC's
Mystical Garden - Cricut Imagine
Nate's ABC's
New Arrival
New Testament
Nifty Fifties
Noah's ABC Animals
Notebook Doodles - Cricut Imagine
Nursery Rhymes
Nursery Tails - Cricut Imagine
Nursery Tails - Cricut Imagine
Office Help
Old West
Old West
Once Upon a Princess
Ornamental Iron 2
Pagoda
Paisley
Paper Doll Dress Up
Paper Dolls For Everyday
Paper Dolls For Everyday
Paper Lace
Paper Lace 2
Paper Play
Paper Pups
Plaintin Schoolbook
Pooh Font Set - Disney
Preserves
Pretty Pennants - Cricut Art Cartridge
Preserves
Pretty Pennants - Cricut Art Cartridge
Printing 101
Printing Press
Quarter Note
Robot Party
Quarter Note
Robot Party
Robotz
Rock Princess
Sans Serif
Sentimentals
Sesame Street Font
Sesame Street Friends
Scandinavian Christmas Cards
Simply Charmed
Simply Sweet
Small Talk Frames & Tags
Smiley Cards
Snapshot Everyday – Cricut Imagine
Snapshot Everyday – Cricut Imagine
Snapshot Nature – Cricut Imagine
Snapshot Texture - Cricut Imagine
Snow Angel – Cricut Imagine
Snow Day
Soccer
Soirée Lettering - Anna Griffin
Songbird
Sophisticated
Space Party
Speaking of Fall
Speaking of Winter
SpongeBob Squarepants - Nickelodeon
Spring Chic - Cricut Imagine
Spring Chic - Cricut Imagine
Stamped
Stamping
Stand and Salute
Stone Script
Store Front
Storybook
Straight from the Nest
Street Sign
Stretch Your Imagination
Suburbia
Sugar & Spice
Summer Vacation
Summer in Paris
Superman - DC Comics
Sweater Weather - Cricut Lite
Sweet Treats
Sweethearts
Tablescapes - Fall & Winter
Tags, Bags, Boxes & More
Tear Drop
Teddy Bear Parade
The First Few Years
The Good Ole' Days - Cricut Imagine
Tie the Knot
Toy Story
Toy Story
Trick or Treat
Trim the Tree
Trim the Tree
Twinkle Toes
Valentines Day
Vintage Papers - Cricut Imagine
Walk In My Garden
Wedding
Wild Card
Wild Card 2
Winter Frolic
Winter Lace
Winter Frolic
Winter Lace
Winter Wonderland - Anna Griffin
Winter Woodland
Word Collage
Wrap it Up
Yummy Art - Cricut Imagine
Yummy Art - Cricut Imagine
ZooBalloo
Zoo Day - Cricut Lite
Have you all wondered what a Cricut cartridge looks like on the inside? I know that I have wondered that myself so I found a photo that shows what is going on inside...

Pretty neat...right??
I hope you all found this as interesting as I did!
Thank you for stopping by today and if you would like to know how I save money when purchasing these cartridges leave me a comment below. How do you save money when buying cartridges or craft supplies? For me it is alot of fun to save money when purchasing a cartridge, great craft supplies, or anything actually, and use that saved money on something else!
As always...Have a fabulous day & Big Cricut Hugs to you all ....
~Terri
Subscribe to:
Posts (Atom)