Background

Wednesday, March 4, 2015

RUN..$.25 Burlap Rolls Sale Walmart...RUN! RUN! RUN! My Incredible Burlap Haul....

Crafters boy do I ever have a monster of a 
SALE for you...
While shopping at my local Walmart today I was cruising the craft aisle, you know like I always do, and on one of the end caps they had a bunch of burlap. 
The price sign on the top said the burlap was the normal price of $3.47 so I grabbed 2 rolls of off white burlap and off I went.

Before I check out I always scan my items at a price checker just to see if the item rings up a different price or is on sale...well as you can imagine my shock, surprise & GIDDY excitement when they rang up for only .25. That's right a quarter for a roll of burlap! I never moved so fast in my life to get back to the burlap and I grabbed as much as I could. 
People were literally looking at me like I was a crazy woman but I didn't care, not one little bit..lol

Now we all know that us crafters love shopping for craft supplies but we love it even more when you find an AMAZING deal such as this. Shoot, I am still excited that I found all this burlap for .25. 

Listen to my savings.... All of this burlap totalled $14.25 but if I paid full price I would have paid a whopping $197.79!!! WOW!

If you shop at Walmart RUN...Run as fast as you can to see if the burlap is marked down at your store. Just remember that even if the sign says a certain amount it may be on sale so SCAN your items before you check out that way you can get more if you wish. My Walmart had other burlap on the end caps that rang up at $2.00 and the normal $3.47 so if you are not sure if it is on clearance just ask someone. I'm betting that the $2.00 burlap is most likely on clearance for .25 too but they just didn't get marked down. Actually I am gonna head back tomorrow and see if those ones are also on clearance. 

 Each burlap roll is 5.5"x30 feet for the normal burlap rolls and the smaller, colored rolls are 5.5" x 15 feet.
That's a lot of burlap!!


If you all find burlap at your store I would love to know if you were able to get them for .25. I am sending out big clearance vibes to you all.. hopefully that helps! As always feel free to leave a comment telling me what amazing deals you found and how much you got. 
Happy Shopping!

As always Big Burlap Hugs....
Terri

Saturday, February 21, 2015

Sneak Peek Craft Room Reveal....Great Organizing Ideas...


Hello crafters...Today I wanted to share a sneak peek of my craft room. Finally I have been able to re-organize and clean out my craft room. Before I went through every thing I really didn't realize just how much stuff I had. It was almost like Christmas day because I completely forgot that I had so many things. There is no doubt that part of it was fun. Who doesn't like Christmas? Today I wanted to share a little peek with you all so you can see the direction that I am heading. The photo above shows the shelves that hold my cricut cartridges, all of my mason jars that are filled with buttons, a ton of buttons actually, some wooden letters, chipboard embellishments, beads, bling, embroidery thread, flower making supplies, brads and so many other fun things that I can easily reach when I need it.
 Besides it is always pretty when you can see exactly what you have. 

My cricut cartridges are organized and each shelf has 2 rows of cartridges and a partial row on top of the back row. This allows quick & easy access when I need to grab a particular cartridge. Organizing cartridges can be a challenge for so many crafters. Not having a lot of space can be one of the many challenges when it comes to storing cartridges. Having them displayed like this works best for me and I really like being able to look at them. 

My husband took my two black heavy book cases and attached them together and then he built shelves for the top and secured them to make one solid piece. I really love how it turned out. After he cut the wood he stained it and put it all together. These shelves are able to hold a ton of weight. The weight was always a concern for us because we have had issues with wood warping due to the weight. So I am thankful that he made sure to build something that is super heavy duty and that will last a long time.


Pictured above is a close up of my mason jars and all the pretty goodies they hold.
This is the left side of my self. On the bottom is where I keep my ink pads, embossing powders, glitter, chalks and other things. Honestly, I am not positive if I am going to keep it like this or move things. My husband is building me a custom shelving system for the main wall in my room. This is where I plan on storing my rubber stamps and so many others craft supplies. Currently my new wall shelving system is under construction and once it is done, which is hopefully soon, I will be sure to share what it looks like. So as you can see things will most definitely move and change once everything is installed. I'm so excited and it can't be finished fast enough.


For now my husband bought and put together these heavy duty shelves. Right now I have 2 of them one on each side of my desk. This is where I keep my Cricut machines, sewing machine, Cuttlebug and embossing folders, my We R Memory Keepers The Cinch, lots of ribbon and etc. What I like most about these shelves is the amount of weight they can hold. I believe each shelf can hold up to 500 pounds and as you all know craft supplies can be bulky and very heavy. Originally I was going to have custom built shelves but weight was a big concern. Thankfully that is no longer a concern with these shelves. 
We bought these shelves from Home Depot if anyone is interested. We utilized the holes on the shelves by cutting dowel rods, painted them black and put as many ribbon spools as I could. It really is a great way to store my ribbon and it is very easy access. 


Pictured above is my shelf on the left side of my desk. As you can see right now it holds tons of paper, mat stacks all different sizes, my stamps are being housed here until my wall shelf is installed and then they will be moved to their new home. On the bottom shelf is some of my 12 x 12 mat stacks and I have a lot. So far this is what I am having the most trouble with because it is not easy to grab what you need and go. They are so darn heavy and it's just not as easy as I would like it to be when I need to grab a particular mat stack. Before I had these shelves all of my paper was stored where my Cricut cartridges were. It was much easier for me when I stored them there so I need to figure something out but I know will eventually. 


A close up of my ribbon. There is more ribbon on my other shelf where my tv is but it's a little harder to see.


Here is a sneak peek of my closet. Before you say anything I know..it is over filled and it's a clutter city! I'm working on it...lol

You can see for now my punches are on the top shelf and the cubbies are separated into different categories. For instance one cubby has my burlap and material, another cubby holds all of my different brand markers, rubber stamping markers, colored pencils and things of that nature. Several of the cubbies have bins that are filled, and I mean stuffed with things like stickers, chipboard, letters and all of my Jolee’s embellishments and stickers, one has my yarn, twine and tons of ribbon. They are all completely stuffed but at least I know where everything is when I need it. I also have one for all my adhesives, atg gun tape, snail adhesive, glue dots and pop dots. I could go on and on. Once my room is completely finished I plan on doing a detailed tour so you can see everything.  That can’t come soon
enough. 

Think that I have enough play dough? Those yellow bags on the floor are all bags of mini play dough. You don't see a big clear bag that is filled with loose play dough containers. I use these for when I make goodie bags for school or even halloween. 


On this side of my closet you can see my We R Memory Keepers Lucky 8 punches on the top shelf next to some of my Martha Stewart punch cartridges, those little plastic containers hold some of my Prima flowers, fabric flowers with other embellishment type things. The big red and white Bear Paw box is filled with acrylic paints, I store my Spellbinders and Cuttlebug & other brand dies in one of the black fabric drawers. I mean I have almost everything in my closet. There is so much I didn't show you yet.
Here is my desk that sits in between my heavy duty shelving units. For some reason my desk looks a lot smaller then it really is. It's actually pretty good size. This is obviously not quite finished and things will be re-arranged but this is what it looks like right now. Please excuse my big box of scraps that is sitting on the floor. lol Looks like it's that time again to go through it and cut them down to different sizes and organize them. My box is over flowing with scraps. 

Here is my spinning organizer that sits on my desk. This is one of my favorite things in my room. It holds all the things I use often.

Here you can see my tv that my husband hung up on my shelves. I can pull it out and swivel it when I need to move it which is so nice. My new computer will be on my desk which you can see in the photos below. 


So that pretty much is it my friends. I have so many amazing things to hang up and things to decorate my room and will do that once my wall shelving system is installed which should be soon. It's definitely coming along and I cannot wait until it is 100% completed so I can get in there and make so many beautiful and fun things. 


Thank you for stopping by today and I will see you all soon. I have a few projects to share with you all. I know that it has been a long time since I posted last...we have had a lot going on but slowly but surely I am getting back in the grove of things which I am so excited about. I really missed you guys. Hope that you are all staying warm with all of this snow and cold freezing weather we have been getting lately. Talk to you soon!! 
Big Cricut Hugs....


Terri


Friday, August 22, 2014

Shaker Cards Are All The Rage...

What's shaking crafters? Today I wanted to share some super adorable shaker cards that I found on Pinterest. Shaker cards really are SO much fun and the sky is literally the limit when it comes to what you can do with them.
Shaker cards really are pretty simple to make despite
how complex they may look.
Let's take a look at some really cute and creative ideas. Hopefully this will inspire you to create a shaker card
of your own.

Part of the fun when creating these interactive cards is coming up with different and unique ideas to use as the "shaker" part of the card. Imagine the possibilities because you can use any type of embellishment, confetti, beads, buttons, glitter, sequins, eyelets, snaps or
whatever your heart desires!
Look around and see what little things you have in your craft stash that would be perfect to use in a shaker card. I know that I probably have a million things that I could use right now sitting in my craft room. Part of the fun is finding things you can use and remember that each item will create a different look.


This card actually has real coffee beans. How cute is that?
Those coffee beans fit in beautifully with the theme!


Think outside of the box and use things that maybe you ordinarily wouldn't. I love this idea of using coffee beans because it is different and not expected plus
it is absolutely adorable!


I really love all of these cards and they really are all so different. This adorable star shaker card has sequins inside.
How fun are these 3 different sized stars and of course
the best part is all 3 stars shake!


Consider using die cuts or punches to create a look like these cloud cards. If you are anything like me then you have lots and lots of die cuts & punches sitting in your craft room.
One phrase that I always go back to is
"Think outside the punch"!


These clear treat cups are one of my all time favorite ideas for a card like this. Consider using clear plastic candy molds. You can buy them pretty cheap and a mold could possibly make up to 4 to 6 or more cards depending on the size of the mold. Simply cut each individual mold apart and adhere it to your card adding whatever "shaker" you wish inside.
 
Most if not all candy molds are embossed with an shape/image which you can then use those
 images to fit your theme. 
Shaker cards are so different from your basic ordinary card and most of all they are so much FUN!

This wedding card is probably one of my most favorite shaker cards ever! The combination of the crisp white colored cardstock with the silver is so beautiful and classic to me.
Anyone would be absolutely thrilled to receive
a gorgeous card like this.
How about making this into an anniversary or birthday card?

Utilizing different shapes can change the look and
 feel of a shaker card.
Like I said earlier the possibilities really are endless.
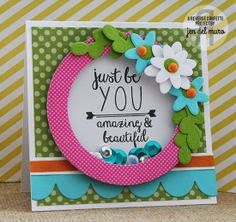
How cute are those little felt flowers?

Even using plain cardstock in several different colors like this card above is really cute. Using a hole punch to create some fun confetti is a simple idea but it sure doesn't look so simple after your card is finished does it?

The idea of using some stamped images in combination with confetti, glitter, sand or whatever really adds that little extra wow factor. It has a nicely finished look to it.
 I have even seen shaker cards with ice cream sprinkles inside. When looking for inspiration for your shaker card think about using items that maybe your normally
 otherwise wouldn't use.
You may just surprise yourself!

Ok, how cute is this sweet get well shaker card?
Imagine giving this to someone who is not feeling well, someone who just had surgery or who is in the hospital.
This is sure to brighten up their day!
What about making a cute get well shaker card
for a child who is ill?!
Actually, I can picture a child shaking this card right now.
Picture them with a huge smile on their precious little face!
A smile helps everyone feel better.
For this card I really love the pink and brown color combo but the book paper is my favorite with those adorable birds sitting on a branch! I have always been a fan of using book or dictionary paper on cards or scrapbook pages.
So darn cute!

This is a different take on the shaker card and I really love how the little red hearts look like they are falling out of the mason jar. When you think about it there are a million and one ways to make one of these cards. How cute would this mason jar be with fireflies or lightening bugs
as I called them as a child??!!
That is the beauty of creating...limitless possibilities!

A shaker home decor idea...Shut the front door!
How adorable is this? This makes me want to make something for my home...wait... actually I just inspired myself and I am definitely going to do that soon.
Who would have thunk it?
Every single item shared here is pinned in my
Cards, Crafts & Inspiration board on Pinterest. There you will find the pinner who created & added these adorable & creative cards plus hundreds more.
When I was looking for sample cards and ideas for today's blog post I literally had 61+ cards picked out to share with you all but then I thought maybe that would be just a tad bit of an overload....just a tad right? lol
Yeah, I think so too! lol
While you are there feel free to follow me if you would like. I am a Pinterest-a-holic like for REAL! On any given day I seriously pin throughout the entire day and those pins really add up. It is rare that I pin less then 100 a day.
Do they have rehab for pin-a-holics?
Just kidding....but not really! <wink wink>
Thank you SO much for stopping by and taking a peek at these adorable shaker cards. It is amazing how much talent there is in our world. Looking at cards & crafts on Pinterest is so much fun for me and I am always amazed at how brilliant and creative crafters can be.
 Have you made a shaker card before? Did you find them easy or challenging to make?
Do you have other creative shaker ideas not listed here?
Leave me a comment below and tell me what you think!
 
I would love to see what you come up with so please feel free to tell me where I can find your shaker creations.
 I will be sure to visit you and take a peek at
your gorgeous shakers!
While I am there I will be sure to say hi
 and that I hopped on over
 to see what you created!
It is my hope that today's blog post inspired you even if it is just a little inspiration. Sometimes that's all we need!

Have a brilliant day & as always
Big Cricut Hugs to you all...
~Terri


Monday, May 26, 2014

Embossing Clear Acetate or Plastic Using Cuttlebug Tutorial...

Happy Memorial Day! Boy it has been awhile since I have blogged but now that things in my life are calming down I have more time to get back to what I L❤VE...Crafting! YAY! That makes me so happy..you just don't know!

Today I have a fun tutorial for you all. Embossing on clear acetate or plastic, like the Cricut cartridge clamshells...Don't throw any of your clamshells, embossing folder packaging or any packaging that has clear plastic away. The reason why you would want to keep any and all that you can get your hands on is because you can cut out pieces of the acetate and run it through your Cuttlebug or any embossing machine. Say what??!! I know I was so excited about this technique and was really excited because I have TONS of those packages and I save them them all.

One tip that I suggest is if you start collecting all this clear plastic packaging instead of keeping all that bulk just cut out any pieces of the plastic that you can use and throw the rest away. It is much easier and neater to store the cut sheets of plastic then to keep all that bulky packaging!! Plus, when you want to emboss something really quick your sheets are all cut and ready to go!! Easy Peasy!

Take a peek at my YouTube video here at  http://youtu.be/nKl7sgTVrSI and you will see just how fast, easy and fun this is. The possibilities are limitless and it makes such an impressive look to your card, scrapbook page or craft! Once you try it you will be hooked!

I already have a few other tutorials all ready to post and I can't wait to show you all the fun and creative things you can do with the supplies you most likely already have in your stash!

Hope everyone had a wonderful Memorial Day and I will see you all very soon!!

Thanks for stopping by. I would love to hear your thoughts, ideas and comments so please feel free to leave them below!

One more thing, If you are not already a Two Pink Peas follower on my Pinterest page you are really missing out. I am a pin FANATIC!! Hop on over to Pinterest and follow Two Pink Peas! You won't be sorry!

Until next time...
Big Cricut Hugs!

Terri

Thursday, November 14, 2013

Ipsy November Glam Bag Review & Glam Bag Giveaway

www.ipsy.com
 
Hi crafters! Today I am blogging about something that is not craft related but I LOVE this company so much and I hope after reading this post that you will too. The company I am talking about is called ipsy. I love ipsy so much that I wanted to share this with all of you in case you have not heard of it before or if you have not yet signed up to receive a monthly glam bag.
 
ipsy is an amazing company that is subscription based and for a mere $10.00 a month, and that includes shipping and handling by the way or you could say that the shipping is free, but each month you will receive an adorable makeup bag filled with superb quality makeup products, hair care products, face products and everything else you can think of. Each month/glam bag is different. I have been an ipsy subscriber for awhile now and I have no plans of cancelling anytime soon. By receiving different products from ipsy this allows you to sample different products and brands without the fear of spending a ton of money on one product that you have never used before and being afraid that you will not like it or that it will not look good on you.

Look at ALL you get for $10.00...all of the photo's posted here today are all of the products that I received in my glam bag for the month of November.

www.ipsy.com
Below is a list and close up photos of the products that were in my bag. Each ipsy bag may have the exact same products or you may receive a few different products then other members.  This difference can be based on your preferences when you first sign up.

Ok, so this month I got a lip product from the company "be a bombshell" and the color is called "hot damn".
It's a red lip crayon.
www.ipsy.com

www.ipsy.com
 
Next is from the company "nailtini" & it's a gorgeous nail polish in color caviar cocktail. The best way I can describe the color is that it is a beautiful silver metallic, not too dark and not too light.

www.ipsy.com
 
This next product is by "bh cosmetics" galaxy chic baked eyeshadow in the color eclipse. This eye shadow comes in a really cute flip top box with a magnetic lid and the color kind of looks like a shimmery light purple. It could be darker purple once you put it on but like I said I am not 100% sure yet as I have not tried it because I just received it today. I can say that the color is really gorgeous. I am not one for super bold or dark eye shadow colors but I am excited to try this color.

www.ipsy.com
 
This picture makes this eye shadow look green but I promise you that it is not green. It's a soft metallic purple color. So please ignore the color in this picture.

www.ipsy.com
 
Last of the products is an absolutely beautiful bronzer by "pixi" and the color is called subtly suntouched.
 
Below is a "Star Looks" eye pencil/eye liner in the color amethyst. I did not unwrap it so I cannot describe the color. Sorry about that!

www.ipsy.com

www.ipsy.com
 
The next product is a sheer lipstick lip gallery by ".em Michelle Phan" in the color cabana beige
(I really love this color, it's so pretty on).

www.ipsy.com
 
This does not show the color correctly but I wanted to try and show you what the color sort of looks like. It looks sheer on me, it's very natural looking. 

www.ipsy.com

www.ipsy.com

www.ipsy.com
 
Every single product is gorgeous and I didn't even get to the make-up bag that comes packed with all your products every single month. This month's bag, shown above, is a gold color embossed bag with hot pink lining and hot pink zipper with a gold embossed wrist handle. I would consider it a wristlet and it is so darn precious. If you want to or need to run somewhere really quick and you don't want to carry your purse and all that us girls stuff in them you certainly could use the wristlet/bag as just that....a wristlet.  My purse is probably close to 20 pounds and I am not even kidding. You know how girls want to carry absolutely everything but never seem to need any of it? Well that's totally me and I know that I am not alone! :)

www.ipsy.com

www.ipsy.com

www.ipsy.com

www.ipsy.com
 
If all of that was not enough, every month you will always get coupons with your ipsy glam bag. For example this month you will get 30% off all product purchases from ipsy.com.
 
Every month is different as one month you may get coupon codes for certain companies, usually the coupon codes match the products that are in your glam bag or like this month you get 30% off all products from ipsy.com. It will always be a little double sided card or cards like the two pictured above.

www.ipsy.com
 
www.ipsy.com
 
Oh, and how can I forget the adorable girly ipsy packaging?? Every glam bag is always is delivered to you in a hot pink bubble wrapped envelope which is SO cute, so girly and just so cute! You see the packaging above. Too cute!Oh, and how can I forget the adorable girly ipsy packaging?? Every glam bag is always is delivered to you in a hot pink bubble wrapped envelope which is SO cute, so girly and just so cute! You see the packaging above and what it looks like inside the package when you open it. Too cute!
 
This may sound weird to some of you but I actually save all of my envelopes for later use when I mail something to someone that I love or care about. They are just too cute to just throw away plus it's completely reusable so why not save them and re-use them when you need a cute envelope??!!
Just throw a new label on top of the old label and you are all set to go and you saved money to boot!
Plus, it is a great way to recycle and help the earth and I am always trying to do my part. 

www.ipsy.com
 
Here are a few close up pictures of the glam bag all together.

www.ipsy.com

www.ipsy.com


   This month they are having a one year ipsy glam bag giveaway. If you post a pic of your ipsy goodies either on ipsy instagram (make sure to follow directions carefully and include #ipsy with your picture) or if you don't have instagram you can post your picture on ipsy facebook for a chance to win a one year glam bag subscription.
Of course I already posted mine, fingers and toes crossed!

Even though this has nothing to do with crafting I really wanted to share this with you all. Every girl deserves some amazing goodies and to get them every month makes it even better.  You are probably wondering how to sign up for this amazing deal? Well it's so easy...just go to www.ipsy.com and click on become a member. You will have a series of questions, don't worry as this is super easy and really fast. Ipsy wants to know what products and brands you love the most and after selecting your favorites enter your personal info and credit card or payment method and voila you are signed up. That's when the fun begins. 

I really hope that you all enjoyed this post and in closing I do want to mention that I do NOT get anything in return ever for sharing this even if you sign up and I am never paid (unless posted or sponsored) for my opinions or paid for posting about companies such as ipsy. If I LOVE a product or service I really love to share it with those that I care about and that happens to be every single one of you.

Oh, one more thing....you can absolutely cancel at any time without being penalized. That is important to me as I don't like contracts for things like this. If you happen to sign up I would love to hear from you or after you receive your first ipsy bag.
I would LOVE to know how you love your glam bags. 
So please feel free to leave me a comment anytime because as you all know I always love hearing from you all. 

Tomorrow I am going to share one AMAZING, crazy and insane deal that I found yesterday while out shopping so be on the lookout for that. This is related to crafting, well stamping to be exact and it's an incredible deal that I got. Honestly, I still can't believe it and because of this amazing deal I am gonna have a craft supply goodie bag giveaway!! 
 Until then....
 
Big Cricut Hugs! 
~Terri