Background

Sunday, October 24, 2010

Halloween Treat Bags.. CUTE!!!


Today has been very busy for me. I wanted to make a few cards but did not get a chance to. I was out getting my 11 year old son Casey's halloween costume. Anyhow, I was thinking about what type of treat bags I was going to make for Casey and my 9 year old daughter Hallie's school class.  Every holiday I always make treat bags but wanted something a little different and cuter.
I came up with this. I used Martha Stewarts Drippy Goo punch for the edge of this tag that says Happy Halloween. 
 I thought they turned out really cute. Now I only have to make 60 more..lol. I hope this gave you some idea on how you want to make your child's treat bags. Maybe you don't have kids and you just want to make goodie bags to pass out on halloween. This would be adorable. Oh, the little clear bags I got at Walmart. They were so cheap, only $2.00 for 100 of them..I think it is 100. Anyhow, they are super cheap but there is so much you can do with them. I would LOVE to see your finished treat bags. Leave me a comment and tell me where I can go to see them and I will leave you a comment back.
Thank you for looking and come back soon.

Saturday, October 23, 2010

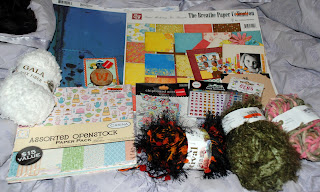
Boy Did I Hit The Jackpot Today... WOW!!!

Today I was out and about and I decided to stop at Big Lots. I have not been there in years. So I go in and first stop at the halloween candy, which I needed. So I got alot of candy, little toys for all the trick or treaters. Then I went to the scrapbook isle and man..there were soooooo many great deals. I am talking Martha Stewart ribbon for $1.00..most of them were only $.50 so I got them ALL. I spent $30.00 on scrapbooking/card supplies and I got about 38 rolls of ribbon. Not all of them are Martha Stewart, just a few of them are. But still.. what a great deal. Then I looked at the paper and cardstock. They were so cheap and I plan on going back again soon. Here is 2 pictures of my loot. Oh, and I got 4 fiber yarn rolls for $1.00 each. What a crazy deal. I would run, run and run to your local Big Lots to see what they have. I even got some alphabet stamps, a glitter patterned paper stack, 12 x 12 paper stack and another 12 x 12 blue paper stack, some embellishments and more. Anyhow, just wanted to share.  Thanks for looking! Come back soon. I add something each and every day.

Thursday, October 21, 2010

Lady Bug Lady Bug Card

Here is a little Lady Bug Lady Bug card that I just made using the
Nursery Rhymes cartridge. 

If you want to make this card this is what you need:

Your finished card size will be 4 1/4" x 5 1/2"
***(Tip: If you take an 8 1/2" x 11" piece of cardstock and cut down the middle you will have enough for 2 cards. Another tip, I always score my papers before I cut and that way I know for certain that it is perfectly straight)***
Nursery Rhymes Cartridge
Red Cardstock
Black Cardstock
Polka Dotted Paper (this is DCWV La Creme Pack)
Ribbon, this Lady Bug ribbon I have had in my stash forever.. I am sorry that I cannot tell you where to buy it.
Adhesive
Zots

How to make:

Cut out your little Lady Bug Fairy's at 2 1/2"
Cut out the Lady Bug Fairy's in the
Base Shadow Blackout Feature at 2 1/2"
Cut out the "Lady Bug Lady Bug" Phrase using the
 Phrase Feature at 1 1/2"
Then cut out the same phrase in the
Phrase Shadow Blackout feature at 1 1/2"
Adhere the ribbon, tie a bow and use Zots to adhere it to the card. I always use a couple to make sure it will stay put.

I hope you enjoy this card and I add new cards almost every day. Please click "Follow Me" and come back often. I will be having great giveaway's, contests and other fun stuff. You will miss out if you do not follow me and I don't want that!
Thank you for coming by my blog.
 Have a great day!


Upcoming Contest & Giveaways....

I am going to be doing some contests and giveaways..but I first need more followers!
If you like contests and giveaways then click "Follow Me" and check back very soon for
many many opportunities to win some amazing prizes.

Here is a video of my cards that my 11 year old son Casey made for me...

6 Little Pumpkins

This card is a different take on pumpkins. I love cutsie cards but I also love grown up cards like this.
Here is what you need to make this card:

I used the Die Cuts With A View La Creme Stack Pack
Die Cuts With A View Latte Stack Pack
The Paper Dolls For Everyday Cartridge
The Pumpkins were cut out at 3 1/4" each
I used some Green Ribbon that I had in my stash
Your Finished Card Size will be 4 1/4" x 5 1/2"
Your Green Mat Size is 4" x 5 1/4"

I would love to see your finished project..leave me a comment and tell me where I can see your little pumpkin card! Thanks for looking! Terri

Over The Moon Witch Halloween Card

Here is a cute halloween card that I just made this morning.
 Here is how to make it..

Materials used:

A Child's Year Cricut Cartridge
Nursery Rhymes Cricut Cartridge
Purple Patterned Cardstock
Purple Cardstock
Black Carstock
Yellow Cardstock
Chalks
Black Ribbon
Happy Halloween Stamp
Pop Dots
Adhesive

Your finished card size will be 4 1/4" x 5 1/2"
Purple patterned mat size 4" x 5"
Purple Cardstock size 2" x 4"
Witch cut out size is 3.82" using my Gypsy
Moon cut out size using my Gypsy is 5.71"

The moon that I used came from the Nursery Rhymes cartridge and the true image is of the
Cow jumping over the moon...
I took my Gypsy and made it where the extra stars did not cut out and then
I cut the cow off of the moon because I did not need that part. I chalked the edges of the moon with black chalk and a gray shimmery from Pebbles
If you have any questions please let me know and I will do my best to help answer them for you.
Thanks for looking! Please leave me comments, I love them!

Wednesday, October 20, 2010

Grown Up Classy Pumpkin Card

I wanted to make a grown up classy pumpkin for the holidays and so I looked through my
Mini Monsters Cartridge and found this adorable pumpkin. So here is the Pumpkin Card that I just made.. yes, it is 1:35 am and I am still up making cards.. :o)
This is what you need to make this beautiful pumpkin card.
I love it because it is different from a normal looking orange pumpkin...the paper is just beautiful.
It is flocked and is very heavy duty. I had to put my blade depth at 6, pressure at max and I still
had a time getting it off the mat.

Materials Needed:

Mini Monsters Cricut Cartridge
Die Cuts With A View La Creme Stack Pack
Die Cuts With A View Latte Cardstock Pack in Green
 (it looks like wood)
Cuttlebug & Embossing Folder
 (I am sorry, I do not know the name of the folder that I used)
Adhesive

How to make:

This finished card will cut out at 7" on your cricut
The pumpkin is on page 60 in the Mini Monsters Handbook
Cut out the Pumpkin in the Card Feature in Black Cardstock from DCWV
Cut out the front part of the card using Layer 1 and using DCWV Patterned Cardstock
Cut out the Stem and Leaf using the Layer 1 feature and hit Shift
Run the Stem & Leaf through the Cuttlebug
That's it for this card, it is so simple..just adhere it all together and you are done!

Tuesday, October 19, 2010

Life Is Tweet Card


This is a little card that I just got done making. It turned out so cute. Here is what you need to make it.

Straight From The Nest Cricut Cartridge
Polka Dot Cardstock from Premium Stacks Latte Stack Textured Cardstock
Dark Purple Cardstock from Premium Stacks Latte Stack Textured Cardstock
Green Cardstock
Off White Cardstock
Black Cardstock
Brown Cardstock
Pebbles Chalk in Earth Tones
Adhesive
Pop Dots

Your finished card size will be 4 1/4" x 5 1/2" in black cardstock
The Bird is on page 28 in the manual
I cut out the Bird at size 2 1/2"
The "Life is Tweet" is cut out at 1 1/2" in the Off White
Hit the Phrase Shadow button and cut the phrase out
again in Green Cardstock
The first bird cut is <Bird1-s> which you have to hit shift
Then I cut out the Wing at 2 1/2" and chalked the edges
Then I cut out the Bird using the Layer/Shadow feature
in a Brown Cardstock
The Cardstock is measured at 2" x 5 1/4" for both the
polka dot and purple
(I cut them both that size and took the ribbon to hide the seams)
Take your Grosgrain Ribbon in a Country Green and hide
the seams of the cardstock
Use your pop dots to adhere the bird on your card after
 placing the ribbon
Then glue your phrases together and adhere them to the card
Chalk all the edges of your bird, wing, beak and bird
 legs for dimension
Viola, that's it! It was a simple yet cute and fun card to make.

Please feel free to leave me a comment to let me know what you think about this card. I would love to see your finished project as well. Thanks for looking.

Terri's Favorite Tool For The Week...

Is the Pink Cuttlebug Embossing Machine.
I bought mine at hsn.com. This Cuttlebug is a bundle that comes with these embossing folders..

  • Dark pink Butterfly Cuttlebug machine
  • Swiss Dots A2 embossing folder
  • D'vine Swirl A2 embossing folder
  • Spots and Dots A2 embossing folder
  • Snowflakes A2 embossing folder
  • Happy Birthday A2 embossing folder
  • Victoria A2 embossing folder
  • Birds and Swirls A2 embossing folder
  • Lace Tree A2 embossing folder
  • Stylized Flowers A2 embossing folder
  • Frills border set (5 pieces)
  • Just My Type border set (5 pieces)
  • With Love border set (5 pieces)
  • Spacer block
  • 2 cutting pads
  • Handle
  • Hex key, screw and plastic cap
  • User manual
It retails for $129.95 and worth every penny. If you do not have one yet I would highly recommend getting one as it adds so much dimension to your homemade projects, cards and scrapbook pages.